Could you check if there are any existing connections and xlate enties for the port 5060 ?
sh connection | in 5060 and show xlate | in 5060
If there is any entry try clearing it using clear xlate/clear conn command and then try applying the static NAT.
! this should be tightened to allow traffic only from your telephone company, or
! people with bad intent will happily place international calls on your account
access-list outside_access_in extended permit udp any host 192.168.3.150 eq 5060
! nat 5060 to 5060
object network NEC_DSX
 nat (inside,outside) static interface service udp 5060 5060
Normally, Network Administrators sit on their desk and work with
network devices using remote SSH from their computer. It is just
sometime that they have to connect the console and work directly the the
network devices.
In this tutorial will guide you about how to configure SSH remote management on Huawei router model AR2220.
2. Prerequisites
In this article, it is presumed that:
a. You have already configured an IP address on the switch
b. You have a direct console access to switch
3. Configure SSH Remote Management
We can start the first step with VTY parameters setting. Login to the
switch with the console and execute the following commands in the
terminal.
Next step, we need to enable SSH service which is called Stelnet
server on Huawei device and this service is disabled by default.
] stelnet server enable
Now we need to configure a user name and password for SSH remote
login in AAA parameters. In the following configuration will create
account name “netadmin” and password is “1111”.
] aaa
local-user netadmin password cipher 1111
local-user netadmin privilege level 15
local-user netadmin service-type ssh
Finally is to generate a strong SSH encryption with 2048 bites as the
following to replace the existing encryption. Exit and save the
configuration.
] rsa local-key-pair create
] quit
> save
4. Test Remote SSH
Start Putty program and enter the management IP address of the switch
to do the remote SSH to Huawei switch on eNSP topology and we should
get a successful result as the following.
5. Conclusion
Now you should be able to remote SSH to your Huawei router AR2220
remotely from your working desk without directly console with the
device. Actually, the above configuration is also work on Huawei router
in any of AR2200 model. If you have any questions or suggestions you can
always leave your comments below. I will try all of my best to review
and reply them.
First of all, an administrator has to find out from which computer or
server occur bad password attempts and goes further account lockouts.
If the domain controller closest to the user determines that the user
is trying to log in with invalid credentials, it redirects the
authentication request to the DC with the PDC emulatorFSMO role
(this particular DC is responsible for processing account locks). If
authentication fails on the PDC, it responds to the first DC that
authentication is not possible. If the number of unsuccessful
authentications exceeds the value set for the domain in the Account lockout threshold policy, the user account is temporarily locked.
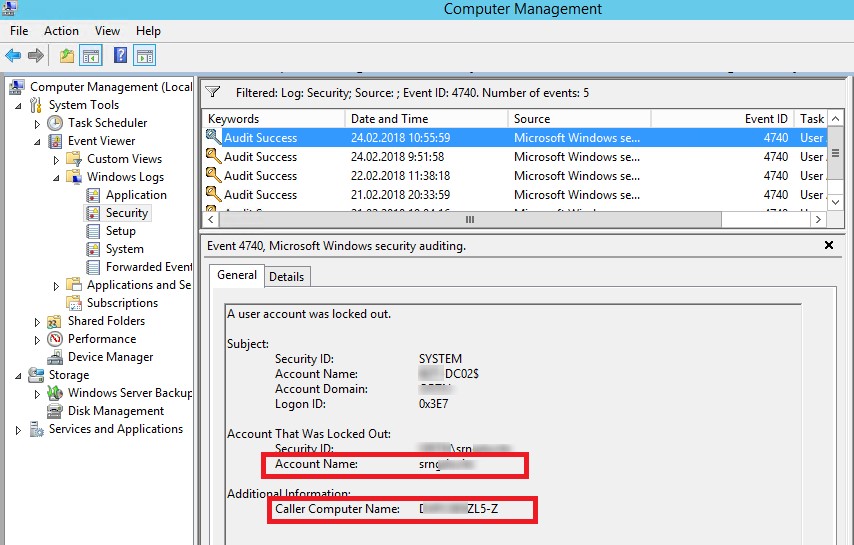
In this case, an event with EventID 4740 are
recorded to the Security log of both domain controllers. The event
contains the DNS name (IP address) of the computer from which the
initial request for authorization of the user came. In order not to
analyze the logs on all DCs, it is easiest to look for the lockout
events in the security log on the PDC domain controller. You can find
the PDC in your domain as follows:
(Get-AdDomain).PDCEmulator
The domain account lockout events can be found in the Security log
on the domain controller (Event Viewer -> Windows Logs). Filter the
security log by the EventID 4740. You should see a list
of the latest account lockout events. From the topmost, scroll through
all the events and find an event that indicates that the account of the
user you are looking for (the username is listed in the Account Name value and the event description “A user account was locked out”).
Note. In a large AD environment, a large number of
events are written to the security log on the on domain controllers,
which are gradually overwritten by newer ones. Therefore, it is
advisable to increase the maximum log size on DCs and to start the for
the lockout source as soon as possible.
Open this event. The name of the computer (server) from which a lockout has been carried out is specified in the field Caller Computer Name. In this case the computer name is TS01.
This will only allow network 192.168.1.0 /24 on the inside interface
to reach the HTTP server. It might be even a better idea to only allow
one or two IP addresses that you use for management instead of an entire
network.
That’s all we have to do on the ASA. Now you can open a web browser
on your computer, I’ll be using Windows 7 and Internet Explorer for
this. Open the following URL:
https://192.168.1.254
You will see the following screen:
The ASA uses a self signed certificate so that’s why you see this
error above. Just click on Continue to this website and you will see the
following screen:
Coming to 4g configuration, this is
really interesting topic which I wanted to pick for a very long time and
thankfully I got newly manufactured and fresh in market router in my
hand. This is Cisco ISR1100 router which comes in many variant and is
just like the old 800 series routers. Cisco has WLAN model, LTE model,
DSL model and normal enterprise router model for this platform.The
difference between old 800 routers and this platform is that this is
IOS-XE based device with enhanced performance. You can find more details
on Cisco website about the model. I will also try to put some
introduction blogs for this.
Lets come to the point and configure Our
Cisco ISR 1111-4PLTEA router for cellular communication. Before jumping
into CLI we need to get a SIM card and an Antenna(no good signal in lab
) . Router has slots available for two SIM cards on the device. I have
inserted Airtel (4G subscriber in India) SIM card in the router . You
can see below image with SIM card and the Antenna installed.
C1111-4PLTEA SIM and Antenna
Once the above setup is done we need to
enable cellular communication through the CLI configurations. Below is
step by step configuration.
We need to configure profile with the APN name which is airtelgprs.com in our case. You can get this information from the provider.
Now
once the cellular profile is activated we can start configuring the
cellular interface and NAT etc so that we can have internal hosts in the
network to communicate the outside world.
Gig0/0/0 is the interface which connects
to my internal network and the cellular0/2/0 is the once bind with SIM
slot 0. Check out the configurations below …
!
interface GigabitEthernet0/0/0
ip address 10.10.10.1 255.255.255.0
ip nat inside
!
interface Cellular0/2/0
ip address negotiated
ip nat outside
dialer in-band dialer idle-timeout 0 dialer-group 1
ipv6 enable
pulse-time 1
!
ip nat inside source list 1 interface Cellular0/2/0 overload
ip route 0.0.0.0 0.0.0.0 Cellular0/2/0
!
access-list 1 permit anydialer-list 1 protocol ip permit
If you are familiar with the cellular
configuration on the 800 series router you will notice that we do not
need to specify the encapsulation(Slip,ppp,hdlc etc ) here.
One this configuration is done DO NOT
forget to start the “interesting traffic” for the dialer ACL defined
range. Else you would not see the cellular interface negotiating IP
address.
C1111-4PL#sh interfaces cellular 0/2/0
Cellular0/2/0 is up, line protocol is up
 Hardware is LTE Adv TSN CAT6 - Multimode LTE/DC-HSPA+/HSPA+/HSPA/UMTS/EDGE/GPRS
 Internet address is 100.66.58.219/32
 MTU 1500 bytes, BW 50000 Kbit/sec, DLY 20000 usec,
 reliability 255/255, txload 1/255, rxload 1/255
 Encapsulation HDLC, loopback not set
 Keepalive not supported
 DTR is pulsed for 1 seconds on reset
 Last input never, output 14:32:42, output hang never
 Last clearing of "show interface" counters never
 Input queue: 0/375/0/0 (size/max/drops/flushes); Total output drops: 0
 Queueing strategy: fifo
 Output queue: 0/40 (size/max)
 5 minute input rate 0 bits/sec, 0 packets/sec
 5 minute output rate 0 bits/sec, 0 packets/sec
 9235 packets input, 1563495 bytes, 0 no buffer
 Received 0 broadcasts (0 IP multicasts)
 0 runts, 0 giants, 0 throttles
 0 input errors, 0 CRC, 0 frame, 0 overrun, 0 ignored, 0 abort
 14387 packets output, 896568 bytes, 0 underruns
 0 output errors, 0 collisions, 3 interface resets
 0 unknown protocol drops
 0 output buffer failures, 0 output buffers swapped out
 0 carrier transitions


C1111-4PL#show ip interface brief
Interface               IP-Address      OK?    Method    Status   Protocol
GigabitEthernet0/0/0    10.10.10.1      YES    NVRAM      up       up
Cellular0/2/0           100.66.58.219   YES    IPCP       up       up
<----SNIP------->
Following are few verification commands,
you can see I am able to reach to the outside world, ping for 4.2.2.2 is
working and the signal strength is also good after putting Antenna to
the router. Before that the signal strength was less than -110 dBm and I
was getting hardly any ping response.
Signal Strength and Ping
You can see the packet input and output stats for a particular profile with the help of cellular connection command. Connection-stats
There are many other verification
commands but I think above set of details should be enough for you to
verify a working Cellular connection.
Thank You for visiting by blog. Please leave your comments and suggestion in the comment section.